Get ready to elevate your barbecue game with the ultimate barbecue beef ribs recipe that’ll have your taste buds dancing! We’re diving into the world of juicy, tender ribs that are packed with flavor and sure to impress at your next cookout. As a passionate griller, I’ve spent years perfecting this recipe, and now I’m excited to share all my secrets with you.
In this mouthwatering guide, we’ll cover everything you need to know to cook beef ribs like a pro. From picking out the best cuts of meat to creating a killer rub with dark brown sugar and garlic powder, we’ve got you covered. We’ll also explore the best way to cook beef ribs, including marinating techniques and the slow-cooking process that’s key to achieving that fall-off-the-bone perfection. So fire up the grill and get ready to become the pitmaster of your dreams!
Selecting the Perfect Beef Ribs
When it comes to creating the ultimate barbecue beef ribs recipe, selecting the right cut is crucial. I’ve learned through experience that not all beef ribs are created equal, and choosing the perfect ones can make or break your dish.
Choosing the Right Cut
There are several types of beef ribs available, each with its own unique characteristics. The three main types are chuck ribs, plate ribs, and back ribs. For our barbecue beef ribs recipe, I recommend using beef back ribs. These come from just behind the shoulder and are the ribs that sit on a prime rib roast. While they tend to have less meat than plate or chuck ribs, they’re perfect for grilling and smoking.
Plate short ribs, also known as dinosaur ribs, are another excellent option. These come from the lower portion of the 6th to 10th ribs and are long and meaty, often reaching 12 inches in length. They’re ideal if you’re looking for a meatier cut with more fat marbling.
Quality Matters
When selecting beef ribs, quality is paramount. I always look for ribs with a good amount of meat on them. Avoid the cheap ones that have had all the meat carved off – these are often sold at lower prices but won’t give you the juicy, flavorful result we’re after.
Look for ribs with a nice cap of meat and plenty of marbling. The marbling, those white streaks of fat running through the meat, is crucial for flavor and tenderness. When cooked low and slow, this fat melts, keeping the meat moist and adding richness to every bite.
If possible, opt for grass-fed beef ribs. They tend to have a more complex flavor profile and are often leaner, which can be beneficial for those watching their fat intake.
Preparing the Ribs
Once you’ve selected your perfect beef ribs, it’s time to prepare them for cooking. Start by rinsing the ribs and drying them completely with paper towels. This step is crucial for getting a good sear and allowing the seasoning to stick properly.
Next, I like to trim any excess fat from the ribs. While some fat is good for flavor, too much can make the ribs greasy. If you’re using back ribs, you might find a thin membrane on the bone side. It’s best to remove this as it can become tough when cooked.
After trimming, I coat the ribs lightly with olive oil. This helps the seasoning adhere and promotes better browning. Then, it’s time for the rub. A simple mix of salt, garlic powder, and dark brown sugar forms the base of a great barbecue beef ribs recipe. You can also add oregano for an extra layer of flavor.
Finally, I always recommend marinating the ribs for at least 1-2 hours before cooking. This allows the flavors to penetrate the meat, resulting in a more delicious final product. With these steps, you’re well on your way to creating the best barbecue beef ribs you’ve ever tasted!
Creating the Ultimate BBQ Rub
Creating the perfect barbecue beef ribs recipe starts with a killer rub. I’ve spent years perfecting my blend, and I’m excited to share my secrets with you. A great rub enhances the natural flavors of the meat without overpowering it, creating a mouthwatering crust that’ll have everyone asking for seconds.
Essential Spices
The foundation of any good beef rib rub is a balance of sweet and savory elements. I start with brown sugar as the base, which caramelizes beautifully during cooking and complements the rich flavor of beef. Next, I add kosher salt and black pepper – these are non-negotiable in any good rub.
To build depth, I include smoked paprika for a hint of smokiness, garlic powder and onion powder for aromatic notes, and ground mustard for a subtle tang. My secret ingredients? A touch of cinnamon for that lip-smacking quality and celery salt for an earthy balance.
Balancing Flavors
The key to a great rub is balance. Unlike pork rubs that lean heavily on sweetness, beef rubs benefit from a more savory profile. I carefully adjust the ratios of each ingredient to create a harmonious blend that complements the beef without overwhelming it.
I always taste as I go, making sure no single flavor dominates. If the rub is too sweet, I’ll add more salt or pepper. If it’s too spicy, I’ll increase the brown sugar. Remember, it’s easier to add to a blend than to take away, so start conservatively with strong flavors like cayenne.
Application Techniques
When it comes to applying the rub, timing is crucial. I like to salt my beef ribs separately, using about 1/2 teaspoon of kosher salt per pound of meat, ideally the night before cooking. This process, called dry brining, allows the salt to penetrate deep into the meat, enhancing flavor and tenderness.
For the rub itself, I apply it just before cooking. Contrary to popular belief, most spices in the rub won’t penetrate far into the meat, so there’s no need to apply it hours in advance. I lightly wet the surface of the meat with water first, as many flavors in the rub are water-soluble.
When applying the rub, I make sure to coat the ribs evenly, pressing it gently into the meat to help it adhere. For beef ribs, I apply a generous layer, but not so thick that you can’t see the meat underneath.
Remember, the rub is there to enhance the natural flavors of the beef, not mask them. With this ultimate barbecue beef ribs recipe and rub, you’re well on your way to creating ribs that are packed with flavor and sure to impress at your next cookout.
Mastering the Slow-Cooking Process
When it comes to creating the ultimate barbecue beef ribs recipe, mastering the slow-cooking process is crucial. This method allows the tough connective tissues to break down, resulting in tender, juicy ribs that fall off the bone. Let’s dive into the key aspects of slow-cooking beef ribs.
Temperature Control
Maintaining the right temperature is essential for cooking beef ribs to perfection. I’ve found that the best way to cook beef ribs is to keep the temperature low and consistent. For outdoor cooking, I aim for around 250°F (121°C) in a charcoal BBQ, smoker, or pellet grill. If you’re using an indoor oven, a slightly higher temperature of 302°F (150°C) works well.
It’s important to note that during the cooking process, you might encounter what’s known as the “stall.” This is when the internal temperature of the meat plateaus, typically around 160-170°F (71-76°C). Don’t panic if this happens – it’s a normal part of the process. To overcome the stall, I wrap the ribs in foil, which helps push through this phase.
Cooking Duration
Patience is key when it comes to cooking beef ribs. Low and slow beef short ribs need at least 5-6 hours, if not more, to become tender. This isn’t a dish you can rush, but trust me, the wait is worth it. The exact cooking time can vary depending on the size and thickness of your ribs, so it’s crucial to cook by temperature rather than time.
I always use a meat thermometer to check for doneness. The ribs are ready when they reach an internal temperature of 205°F (96°C). At this point, the probe should slide into the meat with little resistance, almost like it’s going into butter.
Moisture Retention
Keeping your beef ribs moist throughout the cooking process is crucial for achieving that melt-in-your-mouth texture we’re after. Here are a few techniques I use to ensure my ribs stay juicy:
- Spritz the ribs: After the first hour of cooking, I spray the ribs every 45 minutes with a mixture of beef stock and water, or apple juice and olive oil. This helps prevent them from drying out.
- Wrap the ribs: When the internal temperature reaches 170-180°F (71-76°C), I wrap the ribs in foil or butcher paper. This technique, often called the “Texas Crutch,” helps retain moisture and speeds up the cooking process.
- Rest the ribs: Once the ribs are done, I let them rest in foil for 30-60 minutes. This allows the juices to redistribute throughout the meat, ensuring every bite is succulent.
By following these techniques, you’ll be well on your way to creating the best barbecue beef ribs recipe that’s sure to impress. Remember, the key to perfect beef ribs lies in patience, temperature control, and moisture retention. Happy grilling!
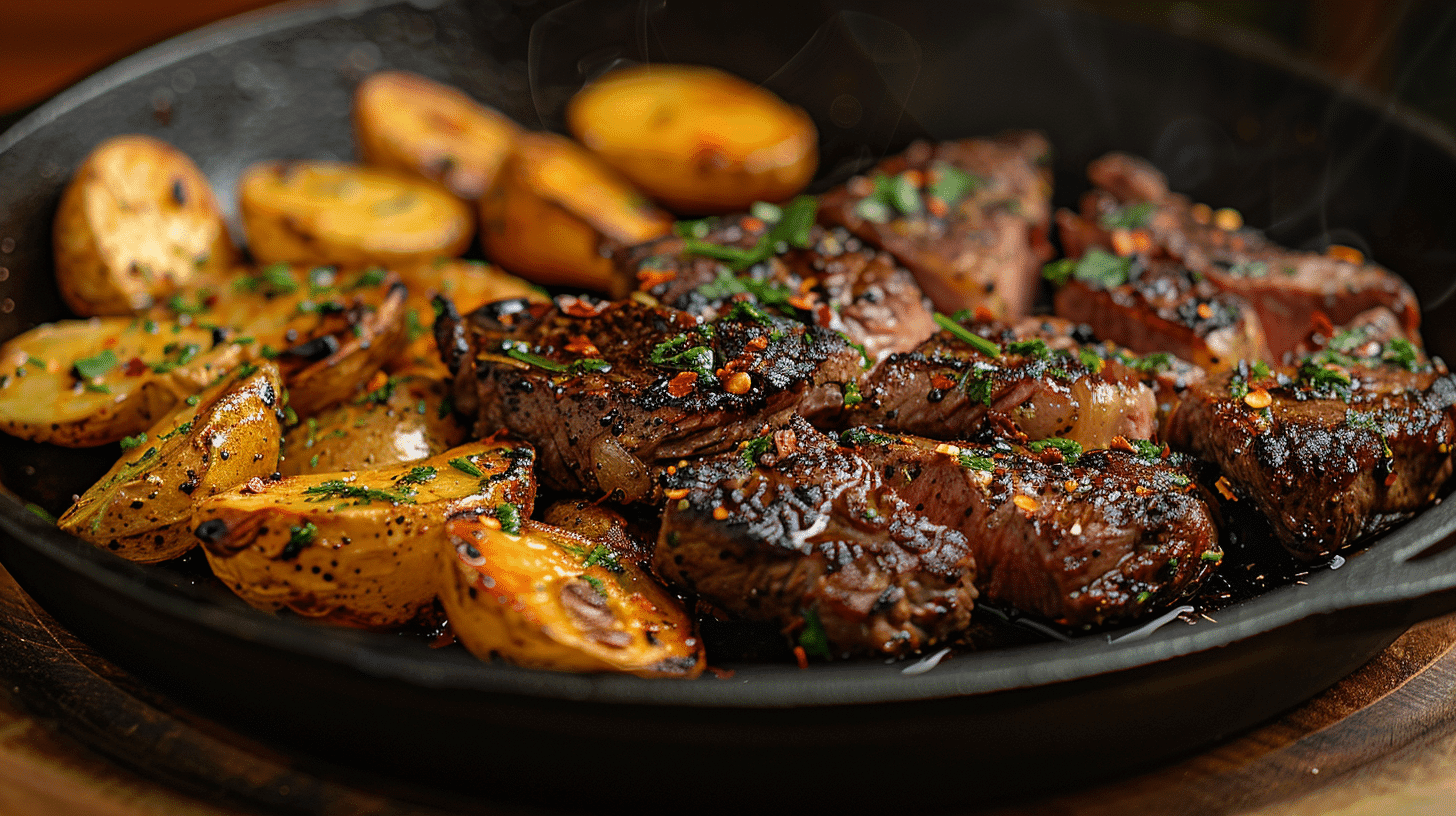
Finishing Touches for Mouthwatering Ribs
As we approach the final stages of our barbecue beef ribs recipe, it’s time to add those finishing touches that will take your ribs from good to absolutely irresistible. Let’s dive into the techniques that will elevate your beef ribs to perfection.
Glazing Techniques
The glaze is what gives your beef ribs that mouthwatering shine and adds an extra layer of flavor. I’ve found that the best way to glaze beef ribs is to start about 30 minutes before they’re done cooking. I use a mixture of barbecue sauce and honey in a 2:1 ratio, which creates a perfect balance of sweetness and tang.
To apply the glaze, I use a basting brush, moving parallel to the rib bones for even coverage. I apply a thin coat to the meat side only, being careful not to oversaturate. For an extra layer of flavor, you can add a second coat about 15 minutes later.
Remember, the goal is to create a glossy, clingy coating that complements the rich flavor of the beef. The sugar in the glaze will caramelize, creating a beautiful mahogany color and adding depth to the taste.
Resting Period
After your beef ribs have reached the perfect internal temperature and you’ve applied the glaze, it’s crucial to let them rest. This step allows the juices to redistribute throughout the meat, ensuring each bite is as juicy as possible.
I recommend wrapping the ribs in butcher paper and letting them rest for about 20 minutes. This short resting period makes a world of difference in the final texture and flavor of your barbecue beef ribs.
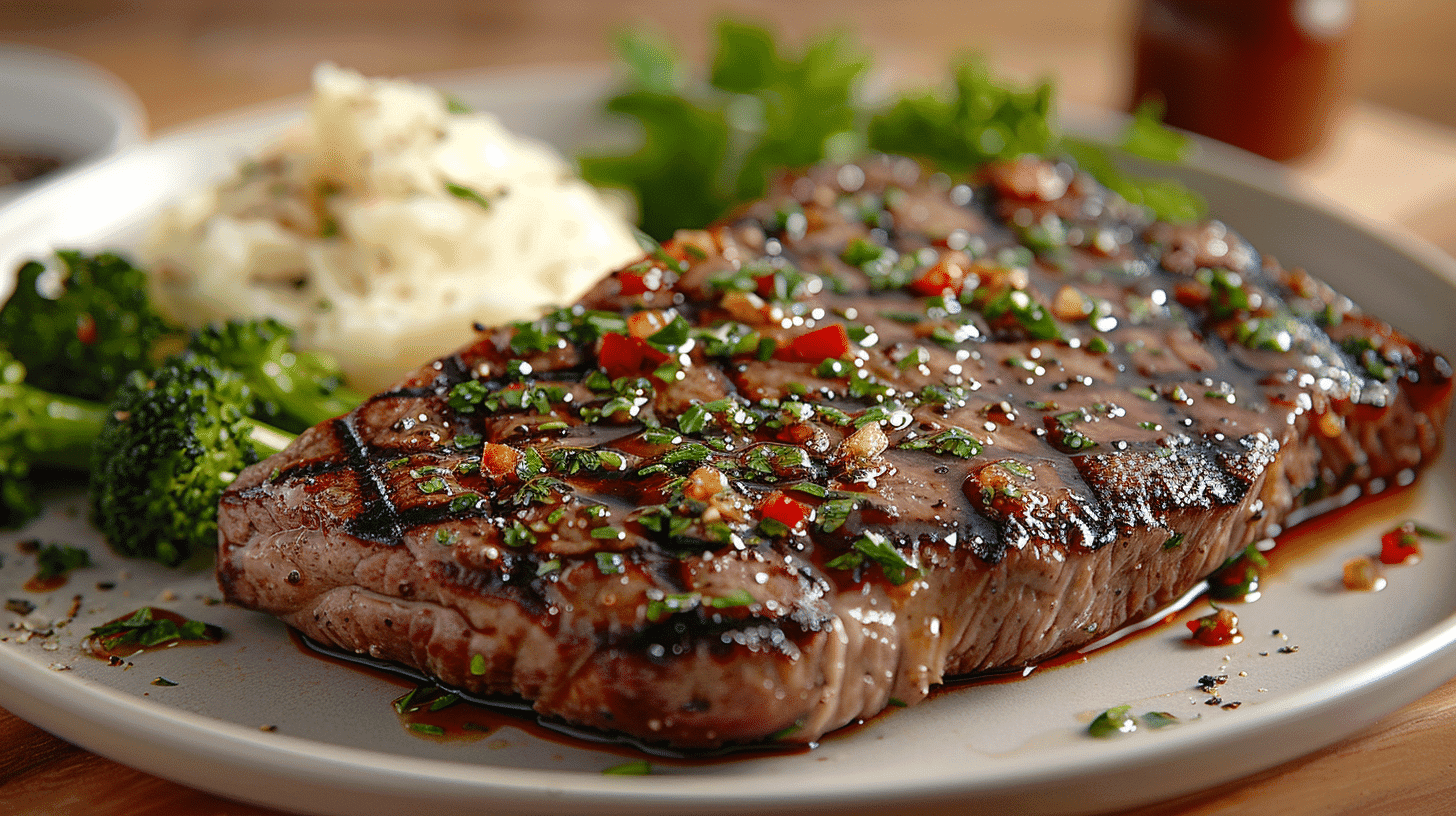
Serving Suggestions
Now comes the fun part – serving your perfectly cooked beef ribs! There are several ways to present your masterpiece, depending on the occasion and your personal preference.
For a rustic, finger-licking good barbecue experience, I love to serve beef ribs with classic sides like steamed corn, coleslaw, and cornbread. These sides complement the rich, smoky flavor of the beef ribs perfectly.
If you’re going for a more elegant presentation, consider pairing your beef ribs with garlic sautéed spinach or mushrooms. These sides add a touch of sophistication without overshadowing the star of the show – your barbecue beef ribs.
Don’t forget about the sauce! The cooking process creates an incredible natural sauce as the beef juices mix with the glaze. For an extra touch, you can strain this sauce to create a silky smooth accompaniment that’s perfect for drizzling over your ribs.
By mastering these finishing touches, you’ll elevate your barbecue beef ribs recipe to new heights. The combination of a perfectly applied glaze, proper resting time, and well-chosen sides will result in a meal that’s sure to impress even the most discerning barbecue enthusiasts.
Conclusion
Mastering the art of barbecue beef ribs is a journey that rewards patience and attention to detail. From choosing the perfect cut and creating a flavorful rub to mastering the slow-cooking process, each step has a crucial role in achieving juicy, tender ribs. The finishing touches, including glazing and proper resting, elevate the dish to new heights, resulting in a mouthwatering masterpiece that’s sure to impress.
With these techniques in your culinary arsenal, you’re well-equipped to create unforgettable barbecue experiences. Remember, the key to success lies in understanding the nuances of each step and adapting them to your preferences. So fire up that grill, gather your loved ones, and get ready to savor the rich, smoky flavors of perfectly cooked barbecue beef ribs. Your journey to becoming a pitmaster extraordinaire starts now!
FAQs
- What is the recommended cooking method for beef ribs? To achieve optimal results, beef ribs should be cooked at approximately 250°F (121°C) on a charcoal BBQ, smoker, or pellet grill. If using an indoor oven, set the temperature to 302°F (150°C). It’s important to monitor the internal temperature with a meat thermometer, keeping in mind that large cuts like roasts, briskets, and ribs often experience a temperature “stall” at around 160-170°F (71-76°C).
- How can I ensure my ribs are exceptionally tender? For supremely tender ribs, follow these steps: first, apply a dry rub to your choice of ribs (baby backs are recommended) and cut them into sections. Wrap the ribs tightly in foil and bake in an oven preheated to 220°F for a minimum of five hours. After baking, coat the ribs with a wet BBQ sauce and broil at 350-375°F for about 15 minutes or until they appear well-cooked.
- What techniques can be used to keep beef ribs moist while grilling? To prevent beef ribs from drying out during the smoking process, you can use a water pan inside the smoker or grill to help maintain humidity. Alternatively, consider spritzing the ribs every hour with water, apple cider vinegar, apple juice, or a similar liquid to keep them moist throughout the cooking process.
- Is it advisable to pre-cook beef ribs before grilling them? Pre-cooking beef ribs before grilling can be beneficial as it allows more control over the cooking temperature and can result in more tender meat. You can pre-cook the ribs by oven-baking, boiling, or using a slow cooker before finishing them on the grill.